Hello, Sign In!
Select Your Vehicle
Select Your Vehicle
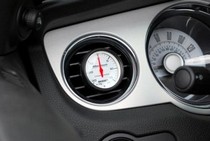
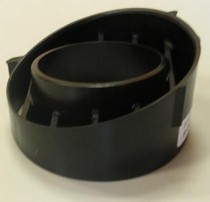
Classic Design Concepts Vent Pod Kit


Part #: 1011-7006-01
$41.00 For each
Free Shipping! *to continental U.S. only
Featured Videos
-
Video Description:In this video, we tell you about the gauges that we installed in our project Integra. Highlights include:
*At 0:59, we talk about the specific gauges we chose and why.
*At 1:46, we talk about gauge accessories, such as sandwich adapters for oil lines.
*At 2:36, we begin our gauges installation.
*At 3:25, we install some gauges in our GlowShift gauge bezel.
*At 6:12, we show you how we installed our boost vacuum gauge's sending unit under the hood.
*At 7:12, we install our oil filter sandwich adapter so that we can get an accurate oil pressure and temperature reading.
*At 10:10, we install our water temperature sending unit.
*At 15:20, we show you the results of our efforts - a slew of new performance gauges! -
Video Description:In this video, we go over the ins and outs of aftermarket gauges. Highlights include:
*At 0:38, we explain why aftermarket gauges are usually more accurate, and therefore more useful, than factory gauges.
*At 0:48, we talk about air/fuel ratio gauges.
*At 2:14, we talk about boost gauges.
*At 2:30, we tell you about boost vacuum gauges.
*At 2:42, we go over fuel pressure gauges.
*At 2:56, we talk about oil pressure gauges.
*At 3:07, we talkabout oil temperature gauges.
*At 3:28, we tell you about water temperature gauges.
*At 3:40, we talk about tachometers.
*At 4:02, we talk about voltmeters and amp gauges.
*At 4:28, we go over exhaust gas temperature gauges.
*At 4:44, we offer our opinion of the most critical gauges to get for your vehicle.
*At 5:08, we tell you about the different types, styles and sizes of gauges available, including mechanical, electric, analog, and digital. -
Video Description:In this video, we show you a typical installation of aftermarket gauges into a diesel truck. Highlights include:
*At 0:36, we tell you which gauges we chose for our installation, and why.
*At 2:22, we get started with the installation of our gauges, beginning with our exhaust gas temperature gauge sending unit.
*At 3:53, we begin the installation of our transmission temperature gauge sending unit.
*At 4:55, we install our boost gauge sending unit
*At 6:50, we run our sending unit wires inside the cab of the truck so that we can hook up our gauges.
*At 8:50, we show you how to tie your gauge wiring into your fuse block.
At 12:45, we install our GlowShift gauge pod.
*At 14:00, we finally hook up the gauges themselves.
*At 14:42, we turn on our new gauges for the first time! -
Video Description:So why do you need a transmission temperature gauge? Watch this video to find out! Highlights include:
*At 0:15, we explain the different situations in which you may need a trans temp gauge.
Fits On:
10-11 Mustang
Description:
With such a variety of aftermarket parts designed specifically for the 10-11 Mustang models, it's more than likely that after some heavy modifications, you'll be looking to obtain more information about your car while sitting behind the wheel. The Mustang Vent Pod Kit is the perfect component to retain your interior's professional look, providing you with the perfect place to install a gauge into the dashboard. Whether you're looking to install a boost gauge after turning to forced induction or if you simply want to keep an eye on various other systems (such as oil pressure), this product is a must for the proper addition of a new gauge to your interior.
-Will fit all 2010-11 Mustangs
-For use with standard 2-1/16" gauges (sold separately)
-Allows air flow to continue to pass through vent
Since 1990, Classic Design Concepts, LLC has been the innovator in the design and manufacturing of quality systematic restyling components. Using OE certified materials and manufacturing procedures that meet or exceed OE standards, CDC’s classic restyling designs have factory fit and finish, with one-of-a-kind appeal.
Classic Design Concepts, LLC creates excitement that enhances the flow of natural lines of the vehicle, while using factory mounting points and hardware to ease installation and ensure proper tolerances. CDC is a TS certified company providing the enthusiast and Original Equipment manufacturers with cutting edge style and unsurpassed quality.
Warranty:Classic Design Concepts offers a 3-year warranty on material and/or manufacturing defects on CDC engineered and designed parts. This warranty does not include consequential damages resulting from the improper installation or use of any product. CDC’s warranty policy is unsurpassed in the aftermarket industry; most parts in the industry are sold "as is". CDC prides itself on high quality components.
Featured Videos
-
Video Description:In this video, we tell you about the gauges that we installed in our project Integra. Highlights include:
*At 0:59, we talk about the specific gauges we chose and why.
*At 1:46, we talk about gauge accessories, such as sandwich adapters for oil lines.
*At 2:36, we begin our gauges installation.
*At 3:25, we install some gauges in our GlowShift gauge bezel.
*At 6:12, we show you how we installed our boost vacuum gauge's sending unit under the hood.
*At 7:12, we install our oil filter sandwich adapter so that we can get an accurate oil pressure and temperature reading.
*At 10:10, we install our water temperature sending unit.
*At 15:20, we show you the results of our efforts - a slew of new performance gauges! -
Video Description:In this video, we go over the ins and outs of aftermarket gauges. Highlights include:
*At 0:38, we explain why aftermarket gauges are usually more accurate, and therefore more useful, than factory gauges.
*At 0:48, we talk about air/fuel ratio gauges.
*At 2:14, we talk about boost gauges.
*At 2:30, we tell you about boost vacuum gauges.
*At 2:42, we go over fuel pressure gauges.
*At 2:56, we talk about oil pressure gauges.
*At 3:07, we talkabout oil temperature gauges.
*At 3:28, we tell you about water temperature gauges.
*At 3:40, we talk about tachometers.
*At 4:02, we talk about voltmeters and amp gauges.
*At 4:28, we go over exhaust gas temperature gauges.
*At 4:44, we offer our opinion of the most critical gauges to get for your vehicle.
*At 5:08, we tell you about the different types, styles and sizes of gauges available, including mechanical, electric, analog, and digital. -
Video Description:In this video, we show you a typical installation of aftermarket gauges into a diesel truck. Highlights include:
*At 0:36, we tell you which gauges we chose for our installation, and why.
*At 2:22, we get started with the installation of our gauges, beginning with our exhaust gas temperature gauge sending unit.
*At 3:53, we begin the installation of our transmission temperature gauge sending unit.
*At 4:55, we install our boost gauge sending unit
*At 6:50, we run our sending unit wires inside the cab of the truck so that we can hook up our gauges.
*At 8:50, we show you how to tie your gauge wiring into your fuse block.
At 12:45, we install our GlowShift gauge pod.
*At 14:00, we finally hook up the gauges themselves.
*At 14:42, we turn on our new gauges for the first time! -
Video Description:So why do you need a transmission temperature gauge? Watch this video to find out! Highlights include:
*At 0:15, we explain the different situations in which you may need a trans temp gauge.
Q: What is a gauge pod? Why buy a gauge pod?
A: A gauge pod is an alternative method of housing your gauges if there is a lack of room in your vehicle or you're just looking for the sporty look.
Q: Will this gauge pod fit my right hand drive vehicle?
A: Most universal gauge pods will work since they are designed to fit a multitude of configurations. However, items like vehicle-specific pillar pods will be shaped to fit left-hand drive vehicles, unless otherwise denoted.
Q: How do you install a gauge pod?
A: Gauge pods include hardware and usually attach to the a-pillar post of your vehicle; sometimes gauge pods are mounted onto flat surfaces as well and attach using the included hardware, depending on the style of the gauge pod. Normal hand tools are required and installation can be completed in minutes.
If you live in California, please note this item may be subject to a Proposition 65 warning. Click here to learn more.


When you click on links to various merchants on this site and make a purchase, this can result in this site earning a commission. Affiliate programs and affiliations include, but are not limited to, the eBay Partner Network.
Not able to find what you are looking for?


Universal 52mm 2" Single Gauge Pod Dash / Pillar Mount Holder Meter Beige-Tan

52mm Universal Single Black Metal Gauge Pod Mount Holder

Universal 52mm 2" Dual Gauge Pod Dash Mount Holder Meter

Universal 52mm 2" Dual Gauge Pod Dash / Pillar Mount Holder Meter Beige-Tan

PazPodz 52mm Flat Gauge Pod HVAC Vent Insert fits Ford Mustang (2015+ S550)


