 Contact
 Andy's Parts Smarts
 Cart
Cart
Hello, Sign In!

Select Your Vehicle
Select Your Vehicle
Neuspeed Boost Gauge Tap Adapter / Eng. Boost Sensor Tap


Part #: NM.498856

$63.20 For each

Free Shipping! *to continental U.S. only
Featured Videos
-
Video Description:In this video, we tell you about the gauges that we installed in our project Integra. Highlights include:
*At 0:59, we talk about the specific gauges we chose and why.
*At 1:46, we talk about gauge accessories, such as sandwich adapters for oil lines.
*At 2:36, we begin our gauges installation.
*At 3:25, we install some gauges in our GlowShift gauge bezel.
*At 6:12, we show you how we installed our boost vacuum gauge's sending unit under the hood.
*At 7:12, we install our oil filter sandwich adapter so that we can get an accurate oil pressure and temperature reading.
*At 10:10, we install our water temperature sending unit.
*At 15:20, we show you the results of our efforts - a slew of new performance gauges! -
Video Description:In this video, we go over the ins and outs of aftermarket gauges. Highlights include:
*At 0:38, we explain why aftermarket gauges are usually more accurate, and therefore more useful, than factory gauges.
*At 0:48, we talk about air/fuel ratio gauges.
*At 2:14, we talk about boost gauges.
*At 2:30, we tell you about boost vacuum gauges.
*At 2:42, we go over fuel pressure gauges.
*At 2:56, we talk about oil pressure gauges.
*At 3:07, we talkabout oil temperature gauges.
*At 3:28, we tell you about water temperature gauges.
*At 3:40, we talk about tachometers.
*At 4:02, we talk about voltmeters and amp gauges.
*At 4:28, we go over exhaust gas temperature gauges.
*At 4:44, we offer our opinion of the most critical gauges to get for your vehicle.
*At 5:08, we tell you about the different types, styles and sizes of gauges available, including mechanical, electric, analog, and digital. -
Video Description:In this video, we show you a typical installation of aftermarket gauges into a diesel truck. Highlights include:
*At 0:36, we tell you which gauges we chose for our installation, and why.
*At 2:22, we get started with the installation of our gauges, beginning with our exhaust gas temperature gauge sending unit.
*At 3:53, we begin the installation of our transmission temperature gauge sending unit.
*At 4:55, we install our boost gauge sending unit
*At 6:50, we run our sending unit wires inside the cab of the truck so that we can hook up our gauges.
*At 8:50, we show you how to tie your gauge wiring into your fuse block.
At 12:45, we install our GlowShift gauge pod.
*At 14:00, we finally hook up the gauges themselves.
*At 14:42, we turn on our new gauges for the first time! -
Video Description:So why do you need a transmission temperature gauge? Watch this video to find out! Highlights include:
*At 0:15, we explain the different situations in which you may need a trans temp gauge.
Fits On:
• R55 Mini Cooper JCW Clubman, • R55 Mini Cooper S Clubman, • R56 Mini Cooper JCW Hardtop, • R56 Mini Cooper S Hardtop, • R57 ... See more
Description:
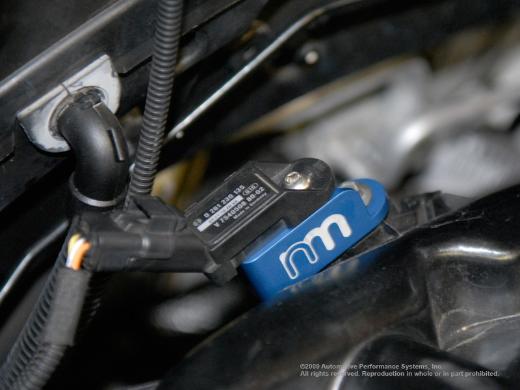
We’re not sure why MINI would not have a boost gauge to monitor boost levels in their S and JCW models, but NM engineering now has a solution to this dilemma. The OEM intake manifold does not have a port to easily get a boost or vacuum reading and as such would require drilling and tapping a hole in the intake manifold.
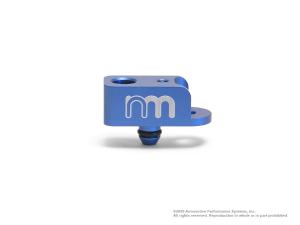
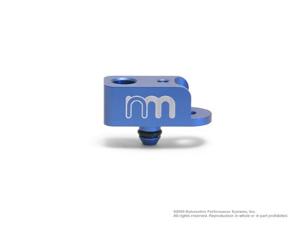
NM Engineering’s Boost Sensor Tap installs simply. Remove the OE map sensor from the intake manifold, install our Boost Sensor Tap in its place and reinstall your OE map sensor onto our precision Computer Numerical Control (CNC) machined 6061-T6 adapter.
Notes:
• Finish : Anodized NM Blue
We’re not sure why MINI would not have a boost gauge to monitor boost levels in their S and JCW models, but NM engineering now has a solution to this dilemma. The OEM intake manifold does not have a port to easily get a boost or vacuum reading and as such would require drilling and tapping a hole in the intake manifold.
NM Engineering’s Boost Sensor Tap installs simply. Remove the OE map sensor from the intake manifold, install our Boost Sensor Tap in its place and reinstall your OE map sensor onto our precision Computer Numerical Control (CNC) machined 6061-T6 adapter.
Notes:
• Finish : Anodized NM Blue
Based in Camarillo, California, Neuspeed was one of the first aftermarket brand names to capitalize on the custom import car scene. Starting out in the late 1970s with a focus on VW performance parts, Neuspeed has been a family run business for over 35 years. Now, with all of that industry experience under their belt, they have significantly expanded their lineup to include products for many of the most popular sport compact cars on the market today. It has long been the Neuspeed philosophy to provide the best possible parts without cutting quality in order to reduce prices. So while you may pay a bit extra, you know that you are getting a part that fits and works properly. In addition they believe in creating modular components that allow you to customize and tune your car in stages according to your individual budget and goals. It is this type of forward thinking that has propelled Neuspeed to the front of the pack.
Featured Videos
-
Video Description:In this video, we tell you about the gauges that we installed in our project Integra. Highlights include:
*At 0:59, we talk about the specific gauges we chose and why.
*At 1:46, we talk about gauge accessories, such as sandwich adapters for oil lines.
*At 2:36, we begin our gauges installation.
*At 3:25, we install some gauges in our GlowShift gauge bezel.
*At 6:12, we show you how we installed our boost vacuum gauge's sending unit under the hood.
*At 7:12, we install our oil filter sandwich adapter so that we can get an accurate oil pressure and temperature reading.
*At 10:10, we install our water temperature sending unit.
*At 15:20, we show you the results of our efforts - a slew of new performance gauges! -
Video Description:In this video, we go over the ins and outs of aftermarket gauges. Highlights include:
*At 0:38, we explain why aftermarket gauges are usually more accurate, and therefore more useful, than factory gauges.
*At 0:48, we talk about air/fuel ratio gauges.
*At 2:14, we talk about boost gauges.
*At 2:30, we tell you about boost vacuum gauges.
*At 2:42, we go over fuel pressure gauges.
*At 2:56, we talk about oil pressure gauges.
*At 3:07, we talkabout oil temperature gauges.
*At 3:28, we tell you about water temperature gauges.
*At 3:40, we talk about tachometers.
*At 4:02, we talk about voltmeters and amp gauges.
*At 4:28, we go over exhaust gas temperature gauges.
*At 4:44, we offer our opinion of the most critical gauges to get for your vehicle.
*At 5:08, we tell you about the different types, styles and sizes of gauges available, including mechanical, electric, analog, and digital. -
Video Description:In this video, we show you a typical installation of aftermarket gauges into a diesel truck. Highlights include:
*At 0:36, we tell you which gauges we chose for our installation, and why.
*At 2:22, we get started with the installation of our gauges, beginning with our exhaust gas temperature gauge sending unit.
*At 3:53, we begin the installation of our transmission temperature gauge sending unit.
*At 4:55, we install our boost gauge sending unit
*At 6:50, we run our sending unit wires inside the cab of the truck so that we can hook up our gauges.
*At 8:50, we show you how to tie your gauge wiring into your fuse block.
At 12:45, we install our GlowShift gauge pod.
*At 14:00, we finally hook up the gauges themselves.
*At 14:42, we turn on our new gauges for the first time! -
Video Description:So why do you need a transmission temperature gauge? Watch this video to find out! Highlights include:
*At 0:15, we explain the different situations in which you may need a trans temp gauge.
Q: Why buy gauges?
A: Gauges can give you the warm feeling of knowing that your engine is healthy and warn you when it isn't. The main gauges that help you monitor the health of any high-performance engine would be the basic gauges, such oil pressure, oil temperature and coolant temperature. Aside from that, they give your car that custom race look.
Q: How do you install gauges?
A: Some gauges are electrical while some are mechanical. Electrical gauges use sensors that have to be installed, while mechanical gauges rely on hoses for feedback. All gauges must be wired up for lighting within your vehicle.
Q: Do gauges work on any vehicle?
A: Gauges are universal and can be mounted virtually anywhere in any vehicle. Gauge pods are usually used to house these aftermarket gauges within your vehicle.
Q: How do I install a tach in a car that did not come with one? How difficult is it?
A: A tachometer is a great instrument to have in your car. Monitoring your engines RPM will help you shift at the appropriate time to gain the best performance or even better gas mileage. Most aftermarket tachometers only have 3 or 4 wires that need to be connected for operation. A main power wire that gets connected to a 12 volt ignition source, a ground wire, a tach signal wire that connects to the coil or the designated signal wire in your cars wiring diagram, and sometimes a wire to run the light inside the tach for night time use, which can be connected to the same power source as your other dash lights. If your car did not come with a tach, but it was an option for your specific model then there is a good chance the wiring is already in place to run the tachometer. It is best to purchase a factory service manual and carefully study the wiring schematics to determine if the wiring is there or not. The only tools you will need for this wiring job are a pair of wire cutters, a pair of wire strippers, a good pair of wire crimpers, some crimp-on style electrical connectors and a little electrical tape. While this is a pretty simple job, if you are not comfortable using these tools it is best to seek professional help.
If you are trying to install a late model gauge cluster, including a tach, into an older model car that did not have one the process is a little more complicated. You will need the wiring diagrams for both the donor vehicle and the car you are installing the gauge cluster in. You will then have to carefully trace and mark each wire to determine what it is for. Finally you connect the appropriate wires together (temp gauge to temp sender wire etc.) and carefully tape off any wires that are unused. Because modern cars use have varied computer controlled components it is not always possible or compatible to swap gauge clusters so it is important to research the subject for your specific model before taking the plunge.
Q: What are the different types of gauges available?
A: There are dozens of gauges available which monitor all types of engine performance. Some common ones are air/fuel ratio, oil pressure, oil temperature, coolant temperature, exhaust temperature, fuel pressure and nitrous pressure gauges. Several more are available, so check our product pages to get more details.

If you live in California, please note this item may be subject to a Proposition 65 warning. Click here to learn more.

When you click on links to various merchants on this site and make a purchase, this can result in this site earning a commission. Affiliate programs and affiliations include, but are not limited to, the eBay Partner Network.
Not able to find what you are looking for?


03-07 GM Chevy Sierra Silverado Speedo Gauge Cluster FULL REPAIR SERVICE + LEDs

2003-2006 Chevy Silverado 1500 Tahoe Yukon Speedometer Instrument Cluster Gauges
2003-2006 GM, CHEVROLET instrument cluster rebuilt, programmed and guaranteed

GlowShift 52mm Tinted 7 Color 15 PSI Turbo Boost / Vacuum Gauge

Speedometer Instrument Cluster 02 03 04 Ford F150 Dash Gauges 149,988 Miles
